Let’s face it - Slack can be too noisy. Through my own personal quest to optimize my use of Slack I discovered there are many settings and adjustments you can play with to fine tune Slack so that it’s still very useful, but not as disruptive.
My goal for this guide is to share those techniques and approaches for limiting noise in Slack and staying productive, while keeping them as actionable and succinct as possible.
Topics covered in this guide:
Part 1 of 5: Limiting Noise
Adjust sidebar settings
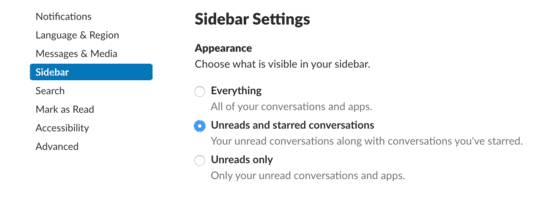
To reduce clutter and cognitive load in Slack, one of the first things you should do is change your sidebar settings to only see starred channels and unread messages. Go to Preferences > Sidebar > Unreads and starred conversations. Once set, all channels with no activity will be removed from your sidebar. When you get a DM or there is activity in a channel you’re a part of, the message or channel will appear in your sidebar. This is a great approach for fans of “inbox zero.” If you need to message someone or view a channel that you haven’t starred, just click on “Channels” or “Direct messages” to find them.
Mute or leave channels
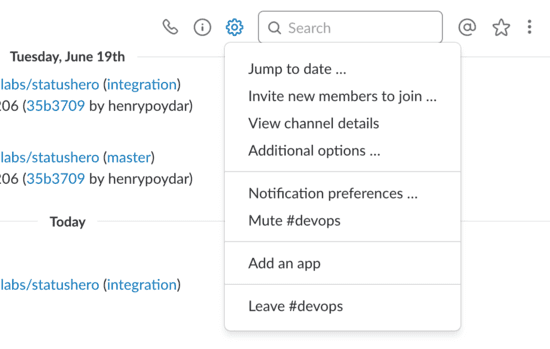
A simple technique for reducing the amount of noise in Slack is muting (or leaving) channels that have a low signal:noise ratio. Just go to the channel preferences by clicking the gear icon and choose Mute or Leave.
But what’s the difference between Mute and Leave?
Muting a channel will keep you in the channel but new messages won’t cause it to be bolded in your sidebar, reducing the interruptions. This is good for rooms like #general or #fun. You want to see the pictures of your co-workers’ dogs but you don’t want to be distracted while in the middle of some deep work.
Leaving a channel completely removes you. You will no longer see it in your sidebar but you can rejoin later if you want to. It’s best to leave a channel when you doubt that you’ll have any involvement in future discussions or regularly need info shared in the room.
Use the compact theme
Sticking to our theme of reducing noise, switching your theme from Clean to Compact will reduce the amount of visual noise with each message. To change the theme, go to Preferences > Messages & Media and chose Compact under the Theme section.
The Clean theme includes users’ avatars and more whitespace. The Compact theme not only removes some of the noise, it also makes it easier to scan and catch up on channels and DMs because you don’t need to scroll as much.


Part 2 of 5: Notifications
Fix the notifications deluge
By default, Slack notifications are sent to everyone on your team every single time something gets posted. Not only that, but the notifications are also sent to every device where you and the team have the app installed (usually desktops and smartphones).
That is an absolute torrent of notifications, even if you only have 1 or 2 integrations configured.
Slack seems to recognize this too, and lets users switch their settings from “All new messages” to “Direct messages, mentions & keywords”. The latter unfortunately swings the pendulum the other way — you are not notified unless your name is mentioned or a keyword or phrase is posted. Not good if you want to get dinged when a sale is made or a customer encounters a bug.
However, the setting is a good starting point for the whole team. Rather than muting everything, this method ensures that team members can quickly grab the attention of one another if need be, and then we can add other important notifications from there.

Add individual notifications by channel
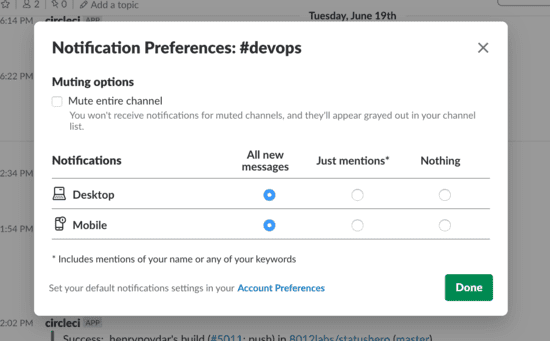
The next step is to selectively turn back on the default settings per channel, per team member. The result you’re aiming at is for each team member to be notified 1.) when they are mentioned by name or 2.) when something happens in a functional area of the team they are active in, which you’ve already conveniently mapped to channels. For example, the engineers would turn on notifications in #devops and #exceptions, and the marketing lead would flip the switch on #sales and #marketing. Again — big bummer — each team member is going to have to do this on their own in channel settings. It’s best to do this from the Slack desktop app:
Set up keywords
Now we’ll set up keywords. Keywords let you receive a notification when a specific word is posted to a channel. Example recommended keywords would be your first name, last name, the name of the teams you are on, and perhaps any project code names. This is a great way to address any “gaps” left in the channel settings.
Turn off mobile notifications
If you’re using the Slack mobile app, then you know how distracting it can be to have your phone constantly vibrating when you’re in a meeting or trying to focus. Mute notifications from the Slack mobile app by going to Preferences > Notifications > Use different settings for my mobile device.

Disable notification sounds and visual noise
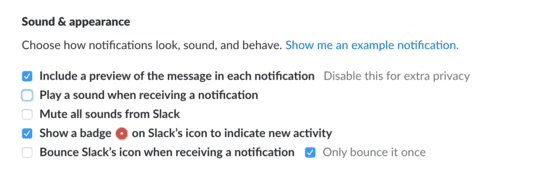
Even after reducing the total number of notifications, they can still be pretty distracting. Make them less disruptive by tweaking the sound and appearance settings. Go to Preferences > Notifications > Sound & appearance and uncheck “Play a sound when receiving a notification” and “Bounce Slack’s icon when receiving a notification”.
Change your “Mark as Read” settings
When you open a channel with unread messages, Slack automatically takes you to your last read message. This can be helpful if small number of messages have been sent. But if it’s a busy channel, reading through old conversations can be a huge waste of time. This is one of the main challenges of group chat - it’s not great for information that MUST be read. To disable this behavior, go to Preferences > Mark as Read and select “Start me at the newest message” and “Mark the channel read”.

Part 3 of 5: Search-ability
Starring
Slack lets you “star” important channels, DMs, and individual messages to make the important items easy to find. This approach is pretty critical if you took our advice and set your sidebar settings to only see starred channels and unread messages. If you didn’t change your settings, you’ll notice that the channels and DMs start to pile up quickly and make the sidebar pretty noisy. Starring important items will help you separate them from the noise, making them easy to find in the future.
To star a channel or DM, click the star under the name of the channel or contact.
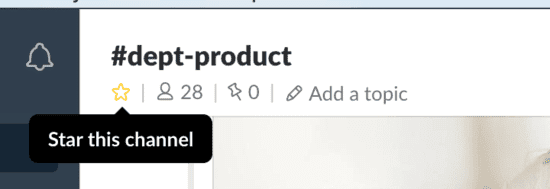
To star an individual message, hover over it and click the star on the right. To access starred items within a channel or DM, click the star in the top-right.

Pinning
If there’s an important message in a channel that will need to be referenced or viewed frequently by others, you can “pin” it to save it from getting lost. You might pin an FAQ, process doc, or project prototype. To pin something hover over the message or file and select the More actions option. Then, select Pin to #channel. Pinned items can be quickly found by clicking the pin icon beside the channel or conversation name.

Search
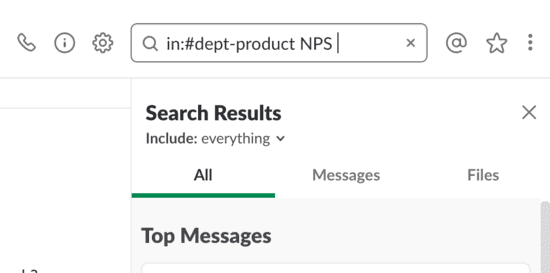
In cases when you forgot to star or pin something, Slack has a powerful search available to help. (Note: on free teams, Slack only archives the last 10,000 messages. Paid teams have everything archived.) Here are some advanced options to make the search even more powerful:
in:[channel] – Searches within a specific channel in:@[display name] – Searches within a specific conversation To:me – Searches messages sent directly to you from:@[display name] – Searches messages from a specific contact has:link/star/pin/reaction – Searches messages with a link, star, pin, or reaction Before:[date] / after:[date] – Searches messages sent before or after a specific date
You can even use multiple modifiers. For instance, if you’re looking for a file, but can’t remember if Jen or Mike sent it, search “from:@jen from:@mike” and then select the files tab of the search results.
Part 4 of 5: Tools and Commands
/remind
/remind is a handy command that lets you set a personal reminder or even one for your teammates. Just type /remind, the time frame, and what the reminder should be. This is great for when you’re doing focused work but also don’t want to forget to handle something.

/collapse
Gifs and videos are part of what makes Slack fun. But some teams abuse them and they can be quite distracting. To automatically collapse them so they don’t distract you, type /collapse into the text box. To bring them back, just type /expand.
Other useful commands
/away — toggle your status to away /dnd — do not disturb. You can also add a time frame. For instance, add “15” and Slackbot sets it for 15 minutes. /feedback — send a message to the makers of Slack /invite — invite a specific user (via @ mention) to a channel /leave — leave a channel /msg — send a message to a user (/dm also works) /mute — stops notifications in the current channel/group or from an individual user /open or /join — type the name of a channel to get access /rename — give the current channel or group a new name /shrug - ¯_(ツ)_/¯ /who — see who’s in the current channel/group
All unread
“All unread” is at the top of your channels list, and takes all unread messages in the channels you’re a member of puts them in one place. It also has live-updates, so it’s easy to use to stay on top of things.

CMD + K / Ctrl + K
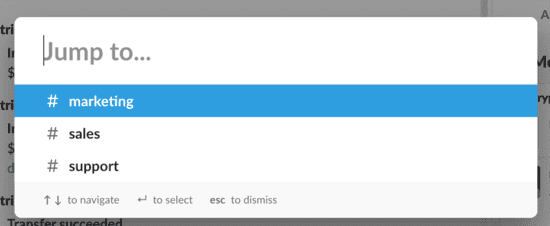
It can be tedious to use the mouse to switch between DMs or channels. Luckily Slack has an easy way to access the quick switcher with a keyboard shortcut. Just use Cmd + K on a Mac or Ctrl + K on PC.
Do not disturb
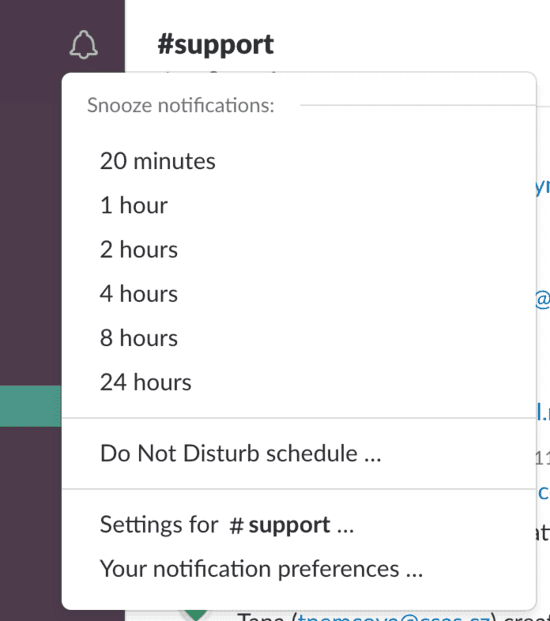
As we mentioned in the commands section, Slack has a “do not disturb” mode which has some additional settings that go beyond per-channel/message and amount of time. You can set an overall do not disturb by clicking the bell at the top of the sidebar and then selecting a time frame. Use the “Do Not Disturb schedule …” to set a window of time when you’ll never get notifications, like 10 PM - 7 AM every day. Administrators can set default do not disturb hours for the whole team in Team Settings.
See what team members are overloaded
A neat feature in Slack that can help you determine which of your team members are dealing with communication overload. This is a useful tool for managers that want to check up on their team. To use it, click on the menu next to the workspace name and click “Analytics”. Then go to the Members tab and sort on messages posted. This shows you who on your team is most active on Slack. If you see a really high number, it’s a sign of teammates who are handling a ton of messages and might need help finding time to focus.

Part 5 of 5: Rules of Engagement
#general and #random
On larger teams, keep chatter on #general to a minimum. Since everyone that’s part of your Slack workspace is a member of #general and #random by default, messages in those channels show up for every user. It can get really noisy for everyone so be thoughtful about when you use it. Keep communication in #general brief and relevant to everyone.
Public vs private channels
Establish guidelines for when to use public vs. private channels. Despite what you might think, it’s typically better to default to using public channels. Information in public channels is easily searchable by everyone so if one of your goals is to reduce tribal knowledge and establish better documentation, using public channels can be a big help. And if you’re concerned about it being too noisy, just remember to configure your notification settings accordingly.
Threads
Encourage people to use threads. They help organize discussions and reduce the general noisiness of group chat. One of the best ways to encourage their use is simply to use them yourself. You’ll see that group norms will be established and most folks will follow your lead. You can also give folks a friendly PM to nudge them into a thread if you see a conversation that’s not using them.
Naming conventions
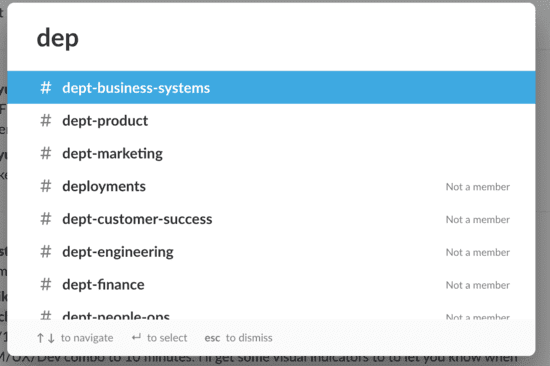
Nothing is worse than having to scroll through dozens of randomly named rooms or searching and playing trial and error to find a specific channel. The easiest way to fix this is to start with a standard naming convention for channels. For instance, all of the department groups could start with #dept- (ex: #dept-product, dept-marketing). This helps not only when searching but also when browsing since the channels are listed alphabetically.
@channel vs @here
@channel is not the same as @here. @channel notifies everyone online, regardless of their status. @here notifies anyone online and in that channel. Typically these commands should be used conservatively since they can be pretty distracting. In the #general channel, you can actually restrict the use of @channel to admins. To set update the setting go to Preferences > Workspace settings > Permissions > Messaging > People who can post to #general.
Default channel settings
To make things easier for new folks that join your company, create default channel settings in advance. If you’re an admin, you can go to Preferences > Administration > Workspace Settings and next to Default Channels, click Expand. Then remove or add channels that you want users to have by default.

That’s a wrap
That’s it for our guide! I hope you found a tip or two that you can use to start limiting the noise in your own Slack.
And if you’re interested in keeping your team in-sync while limiting meetings and noise, be sure to check out our free trial.

